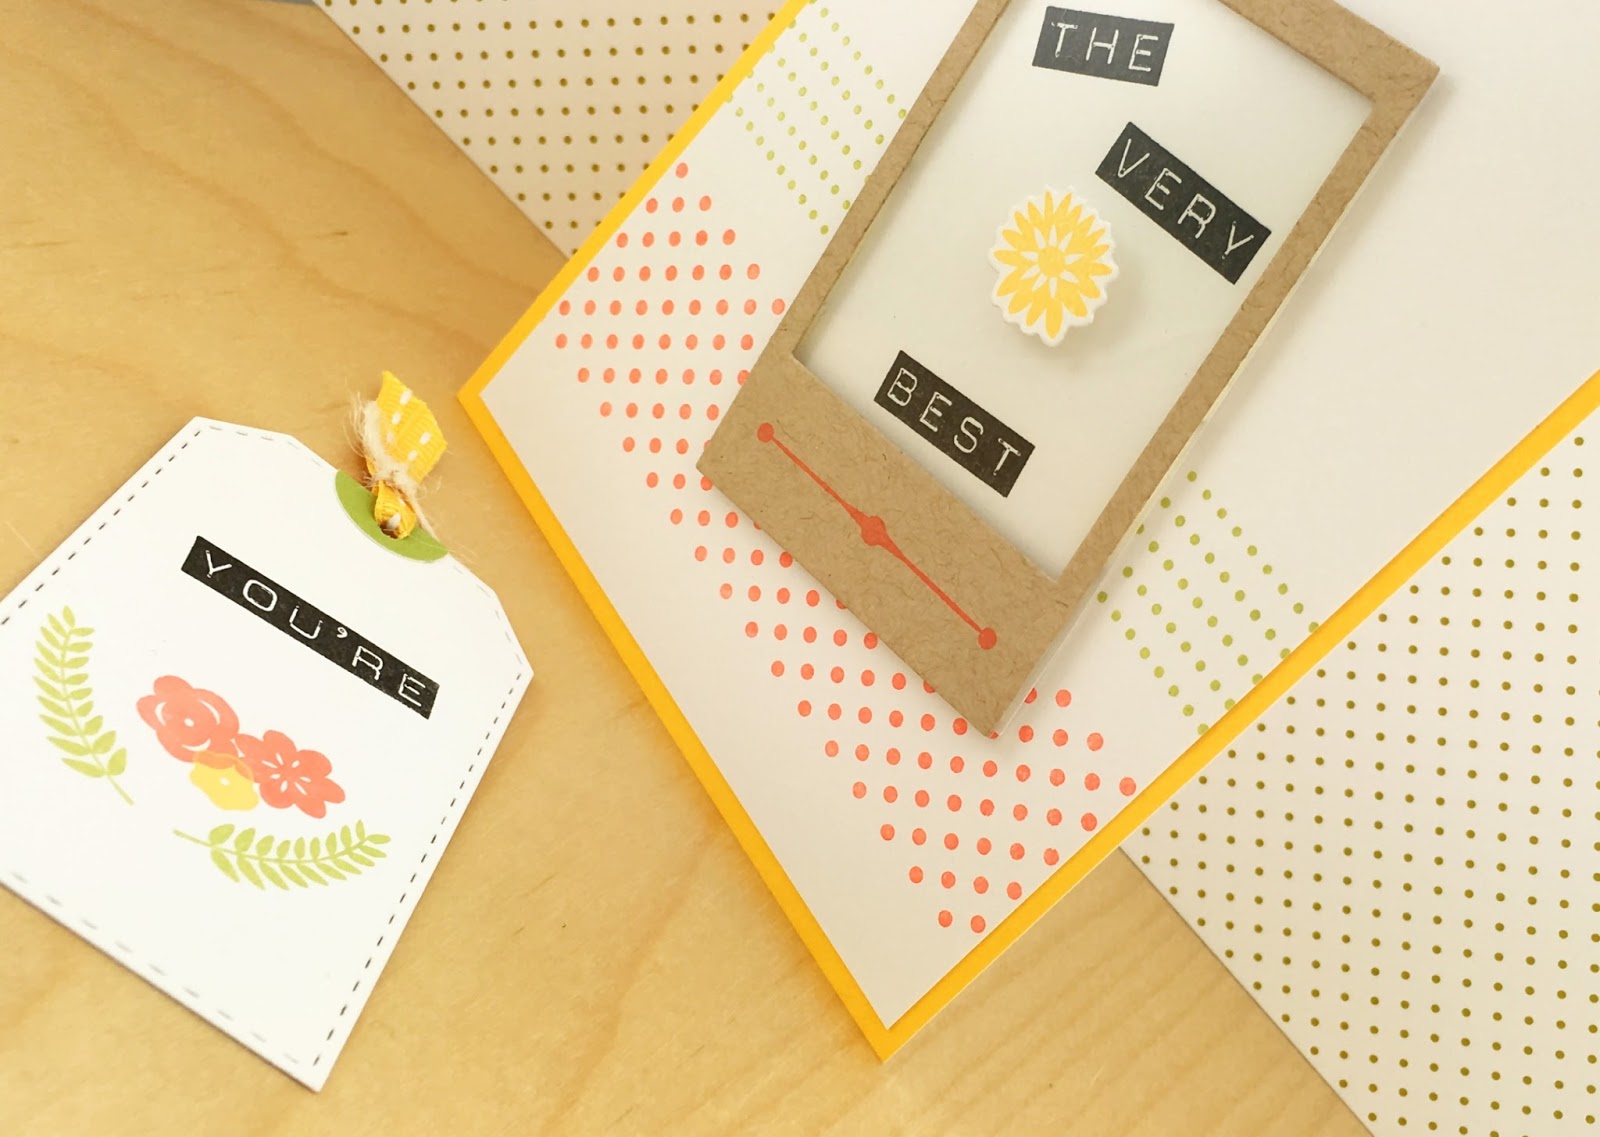
Tag Slide Out Card
- Start with a papaya A2 (5.5”x8.5”, scored at 4.25”) card base and a 4 x 5.25” sugar layer
- Stamp a strip of small dots in sage and larger dots in poppy, from the “darling dots” set, across the bottom portion of the sugar layer
- In poppy, stamp the linear design, from the “mini blooms” set, across the bottom of a kraft die cut photo frame 1
- Using double stick tape, adhere the 2 1/16 x 3 3/8” crystal clear cardstock layer to the back of the photo frame
- In papaya ink, stamp the multi-petaled flower, from the same set, onto sugar paper and die cut it out with corresponding die
- Take the stitched classic tag in sugar, on it, stamp “You’re” from the “Label Maker” set in VersaFine black onyx near the top. Using sage ink, stamp the pair of curved multi-leaf stems in an arc near the bottom. Above this, stamp two of the flowers in poppy and one in papaya. (You may need to use a stamp positioner or do a lot of double checking with the photo frame to make sure things line up)
- Use a 5/8” circle punch to cut a circle out of sage paper, cut in half
- Adhere the sage half circle to middle top of stitched classic tag, punch 1/8” hole in center with Crop-A-Dile
- Put piece of papaya grosgrain stitched ribbon through hole, tie together with piece of vanilla twine
- Take a 2 1/16 x 3 3/8” piece of sugar paper. Stamp “The” and “Very’ near the top and “Best” near the bottom, all from the “Label Maker” set. (Again, you should use the kraft photo frame as a reference for placement)
- On the back side of kraft photo frame/crystal clear cardstock, line all but the top edges of photo frame with VERY narrow strips of foam mounting tape. Use the stitched tag as a guide, since it will need to slide freely, from the top, between it.
- Attach the photo frame to “The Very Best” sugar layer. Slide stitched tag inside.
- Take the die cut papaya flower, mount with foam tape and place on the center clear window of the photo frame. Checking its placement when the tag is in the frame, and when it’s not
- Adhere photo frame unit to sugar layer with the stamped dot stripes, adhere sugar layer to card base


Stamps: A Muse mini blooms, label maker, and darling dots sets
Ink: A Muse sage, poppy, and papaya and VersaFine onyx black
Paper: A Muse sugar, kraft, sage, and papaya cardstock and A Muse crystal clear cardstock
Misc.: EK Success 5/8" circle punch, A Muse papaya stitched grosgrain ribbon, A Muse vanilla twine, 1/8" hole punch, A Muse classic tag, mini blooms, and photo frame die sets, foam mounting tape
No comments:
Post a Comment